 Meade 6x30
finderscope
Meade 6x30
finderscopeFinderscopes And Other Pointing Devices
by Jeff Polston (August 7, 2001, updated 09/18/19)
The possession of a telescope is only the first hurdle to jump when observing astronomical objects. To actually see something you have to be able to point your telescope at the stuff you want to see. It's not as easy as it looks or sounds. The sky is really big. If you don't believe me, just look up a time or two. And the field of view through your telescope is typically very small. I've seen people having trouble using binoculars before, and they are almost an extension of your eyes. Imagine pointing some long tube at a single point of light. Fortunately, there are a number of tools, some of them better than others, that will help you get your main telescope aligned on the object you wish to view.
The basics: Just point the darn thing!
With practice, some people are quite efficient at pointing their telescopes just by looking down the side of the tube. After you've been doing it for a while, you do get use to exactly where you telescope is pointing and if nothing else, it gets you in ballpark. I guess this is simple to using a blowgun or a slingshot. In my younger days, I could actually hit things with my slingshot even though it had no aiming sights. Likewise, for a quite a few years I used an 8" Dobsonian telescope without a finderscope or pointing device. I just put my head against the tube, and usually was able to position the scope very close to what I was looking for. If the object wasn't in the field of view, a small amount of panning was all that was needed to find it. This method works great for bright stuff like the moon or planets. But unless you're good at it, more than likely it will just be a frustrating attempt that will never work.
Next step: the cheap route
The next step up from nothing is having some type of rudimentary means of pointing the telescope. This can be screws or eyehooks that stick out from the side of telescope. Some people are able to point their telescopes just fine in this manner. During a college archery course, we made homemade sights on our bows using the head of straight pin. I was amazed at how well it worked. But unless you place your head at the same point on your telescope each time, or realize the amount of error in this method, it might be just as frustrating as having nothing at all. Granted, it should at least get you in the ballpark area of the object, but without practice, probably not much closer.
Standard equipment
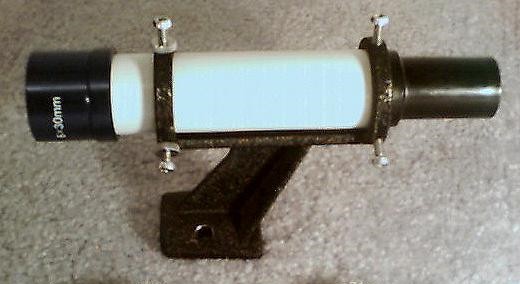
Meade 6x30
finderscope
Most telescopes today come with some type of finderscope. These can be as small as a 5x24mm or 6x30mm, on up to a size of 8x50mm. Optionally, even bigger ones are available for purchase. The first number is the magnification, while the second number is the diameter of the objective. These finderscopes are basically just tiny refractor telescopes that are attached on top of the main instrument. Since they have a much wider field of view, it's easier to point them toward the desired object. They typically have crosshairs, and they point to the same area of sky as the main telescope. Just look through the finderscope, move the telescope until the crosshairs are on the object you want to observe, then look through the main telescope. One thing that confuses some people is that most finderscopes present an upside down image of the sky. Some people can cope with this while others find it too distracting. In fact, some finderscopes do have prisms, which give a right side up view of the sky. Some finderscopes also have illuminated crosshairs so that they are more easily visible against a dark sky. And some finderscopes also have illuminated reticles for help in polar alignment or angular measurements. Despite the power of the common finderscope, some people still find them hard to use. They consider the field of view still too narrow to point very accurately, and using one eye can sometimes be a problem.
Back to the basics, but with a twist!
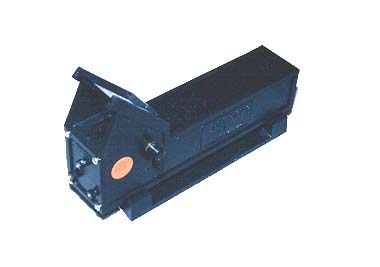 Telrad reflex sight
For those that want the widest field of view while retaining a correctly oriented view, enter the reflex sight. The reflex sight is a unit finder, which means no magnification. The two most common sights are the Telrad and the Rigel QuikFinder. Both operate on the same principle, which is basically like a heads up display. With both eyes open, you look through a clear piece of glass or Plexiglas, onto which concentric rings (or crosshairs) are projected. The net effect is that you see red rings or crosshairs that seem to be floating in space. They are very easy to use. From the star chart you see that your target object is located between this star and that star. You grab the telescope, look through the reflex sight, and move the scope until the ring/crosshair pattern is between the right stars. The field of view is as wide as possible since you are using both of your eyes. The only way to get an upside down image would be for you to stand on your head. I really think that these types of finders are great for beginners and seasoned veterans alike. There are a few others on the market, but I think Telrad and Rigel are the best of the crop.
Conclusion
I use a combination of both a regular finderscope (an 8x50mm) and a reflex sight. I start out with the reflex sight. It either nails the object or gets me very, very close. I then switch over to the finderscope to zero in on the target. Some may ask, "Why use a powered finderscope at all if the reflex sight is so great"? The finderscope magnifies which allows me to see objects that I normally can't see with the naked eye. This helps with my pointing, and also helps me identify objects that are in a crowded field. If I had to recommend one or the other, I'd probably give the nod to the reflex sight, especially for beginners. But if you also have a finderscope, you have the best of both worlds.
To learn even more about the finderscopes and pointing devices I have, and how I use them, visit my other Finders page.